Core Conditioning
In a previous post where I give bad advice on fitness, I emphasized a greater focus on core strength, particularly with regards to core stability. Anyone who’s ever had a back injury knows how much we take our backs for granted, and increased core strength not only reduces the risk of injury, but it makes us more biomechanically efficient.
But how does one go about training our core muscles? Most people immediately think about doing lots of situps, or crunches. If you want to have good-looking abs, then by all means do lots of situps, but this is only a small part of the story. If you want to build core strength, it is essential to also target the lower back, the obliques, and even the pelvic floor muscles (the muscles that you use to hold your pee in). Targeting these muscles can sometimes be quite difficult because it requires you to really think about the exercises you’re doing, rather than repetitively go through the motions.
I’ve been fortunate enough to have had the experience of training myself to isolate various abdominal muscles while simultaneously being able to watch them on an ultrasound machine. There are various exercises that I do to train these muscles and I am going to try to describe some of them in this article.
A helpful thing to remember is that the point of all of these exercises is not to build bigger muscles. The point is to isolate certain muscles, and build strength and coordination of those muscles. These are the muscles that will form a stable base from which almost all bodily movement begins.
Start by lying down on your back with your feet on the ground and with your knees bent. Try to stay completely relaxed. Feel around the front of your lower torso with your fingers until you find the point at which your hip bones protrude. Move upwards just slightly from that point and press lightly with your fingers. Now draw your navel towards your spine (suck your tummy in). You should be able to feel those muscles activate (fyi, these are your internal obliques). Concentrate on being able to breathe in and out while maintaining that muscle contraction and keeping your belly in.
The first exercise is quite easy. While keeping those muscles activated, gently lift your left leg from the ground by about a centimeter (0.39 inches) and then put it down, repeat with the right leg. When you’re comfortable with that, you can straighten the leg that you are lifting. As the exercise gets harder, it is tempting to activate different muscles to help out, but you should resist this urge and concentrate on using those muscles just above your hips. Remember, the idea isn’t to become super-strong, it is to become more coordinated.
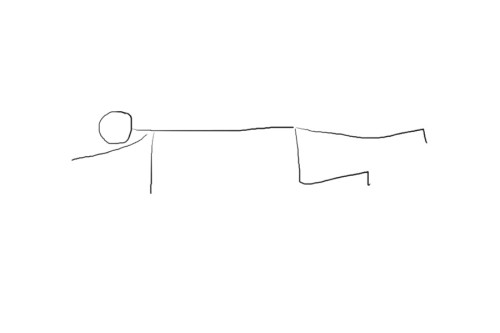
Next, flip over onto all fours and while keeping your tummy sucked in, extend your leg backwards without moving the rest of your body. Once you can do that smoothly, make it harder by extending your alternate arm. (see diagram)
The added difficulty of having to balance on an alternate hand and knee also makes you think a bit about where your “center” is. For males, it is in the middle of the body, about where the belly button is, and for females it is a few inches lower (and for speed skaters it’s even lower because we have such fat thighs). Not coincidentally, it is all the little muscles surrounding that center of mass that we are training for coordination. Concentrate on this first set of relatively easy exercises for a while before moving on to the next exercises, otherwise the proper muscles won’t be adequately trained. If they’re not adequately trained, you’ll move onto the next exercises, get frustrated, and your body will go back to using the wrong muscle groups – the ones associated with actually moving. We’re concentrating on those muscles that are used for stabilizing.
Once you’ve mastered the initial exercises, it’s time to move onto slightly harder stuff. Most of these exercises are designed with a sport like speed skating in mind (surprised? don’t be). Speed skating is very demanding on core stability and also on the stabilizing muscles around the hip joints, and to a lesser extent, the ankles. The following exercises will reflect this.
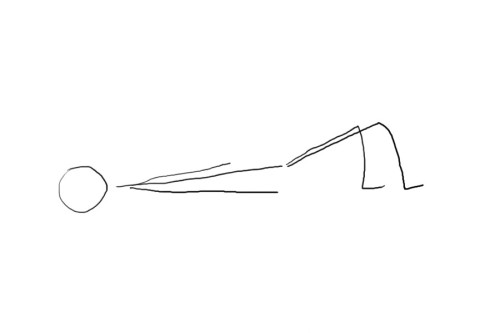
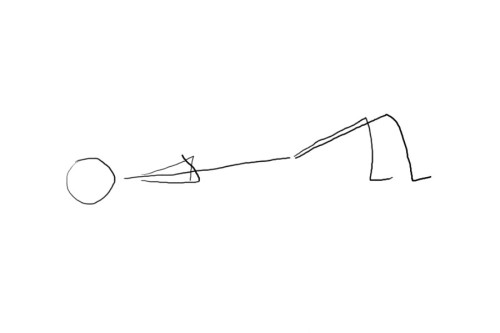
Start on your back again with your knees bent and your feet on the ground as before. Draw your navel towards your spine. Instead of lifting your leg up though, lift your hips off the ground. You should feel a muscle contraction in your gluteals and hamstrings when you do this. It is very important to keep those correct muscles in your abs isolated.
This is a considerably more difficult exercise than the first one, so take your time getting used to it before progressing to the next level, which is simply to take your arms off the ground and cross them over your chest, to add a little bit of instability to the structure.
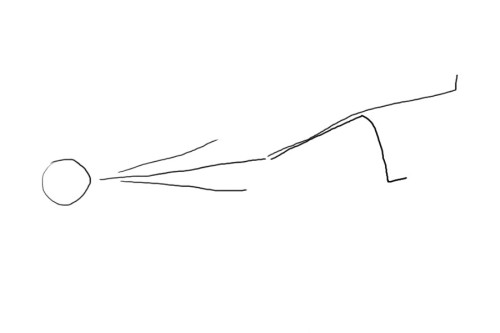
Once you’re comfortable with this, you can do it with only one leg. Be careful though, make sure you are still isolating those muscles above your hips, and make absolutely sure you keep your body completely square (don’t rock from side to side) while balanced only on one foot.
Once you’ve mastered that, you can go one step further and place your feet on an inflatable exercise ball and instead of lifting and lowering your hips, you bend and straighten your legs. This exercise (and you’ll feel it) also targets the stabilizing muscles in your hips as well as your core.
By now the muscles in the sides of your core are probably starting to get stronger. There is a tendency to create abdominal pressure by contracting the whole group of lower abdominal muscles, including the center ones. The feeling is similar to that of being constipated. Try to resist doing this. A way to try to get the correct “feel” for which muscles you’re trying to contract (short of experimenting with a real-time ultrasound imager) is to lie on your back, draw your navel towards your spine, breathe in while concentrating on pushing your ribs out then breathing out as if through a straw. You should feel abdominal muscles in your sides, even in your back, and slightly further up your trunk tighten. Those are the muscles you should be recruiting. (If all of what I just said confuses you, don’t worry about it and just concentrate on keeping your belly sucked in).
The next exercise is quite difficult. Don’t be surprised if you can only do it for about 30 seconds to start with. If you do it frequently (like, every other day) you should be able to slowly build up to at least 2 minute sets.
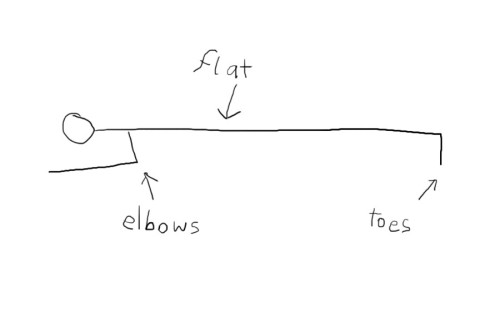
Variously called the “ab plank”, “prone hold”, and “elbows and toes”, this is a very simple and very effective exercise at training the core stabilizing muscles. Resist the temptation to activate the ab muscles down the center of your tummy (the 6-pack muscles, or rectus abdominus) because it defeats the purpose of the exercise. An interesting thing that you’ll find, is that if you only use those 6-pack muscles, you’ll have a lot of trouble getting past 2 minutes, but if you concentrate on training the side muscles, then it actually becomes easier to hold the position for a long time. I used to be able to do 5 minute sets of these without too much difficulty.
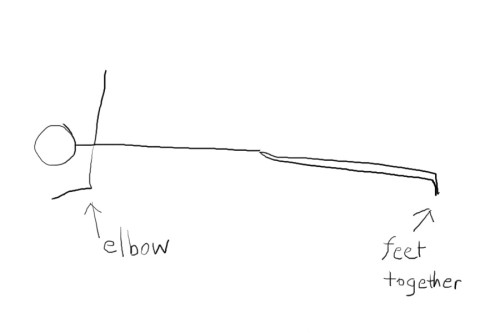
Once you’re confident with this, you can move onto your sides.
The ab muscles are not naturally as strong, nor are they designed to bear as much weight in that direction as in the forward-backward direction (which is part of the reason why we’re much better at running forwards-backwards, than sideways), so don’t expect to be able to hold this position for very long. If you’re into speed skating, you’ll want to eventually do these side holds with only one foot. If you’re after even more difficulty, elevate that foot slightly and then move your hips up and down in a slow controlled manner.
All of the exercises so far have been very static. The reason for this is that the idea is to train your muscles to stabilize you, and when the muscles are being used in that way, they have to contract, but don’t often move very much. Depending on your sport, you may also want to do exercises which involve motion. I will present a few very general exercises here, but you should try to design exercises which involve movements that closely mimic your movements in your chosen sport.
This next exercise is useful because it activates a fairly steady muscle contraction over a wide range of motion. Done properly, it can also aid in your flexibility.
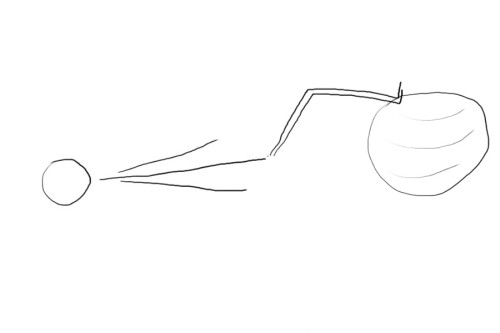
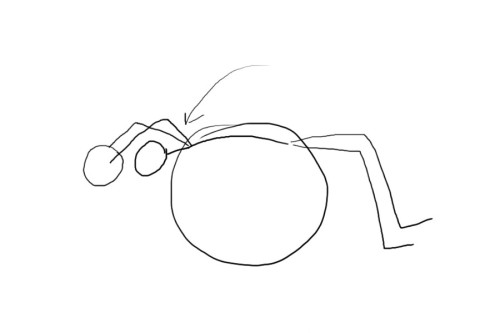
This is the ball throw situp. Being by sitting on the “corner” of an inflatable ball and have someone throw you a heavy object, like a 5kg medicine ball.
Catch the ball (this is important) and arch yourself over the inflatable ball, keeping the medicine ball over your head, then come back and throw the ball at whoever threw it at you. Try to get the thrower to aim the ball at your head, or slightly above your head. The ball should trace a path through the air like a setup for a football header shot (then you catch it, instead of headering it, because it’s a 5k medicine ball).
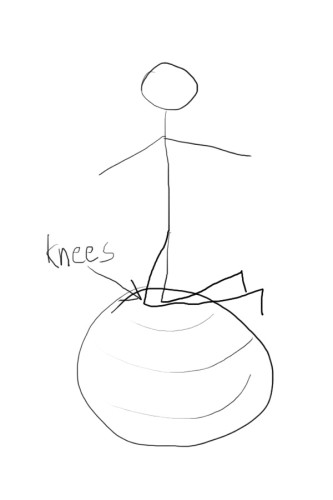
This exercise is simple enough, you kneel on an inflatable exercise ball. Try to kneel “up straight” and if you find it too easy, then cross your arms. If you have a strong and coordinated core (and reasonably good balance), this shouldn’t be very difficult.
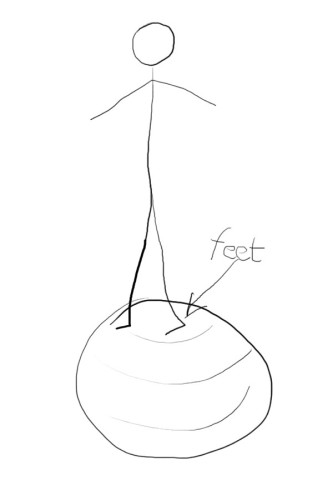
The obvious progression from kneeling on the ball is to stand on it. Difficult as this sounds, it is actually surprisingly easy, especially if you’re good at kneeling on the ball. The tricky part is getting onto the ball. The best way to do it is with the help of a friend, but if you don’t have any friends then try to do it near a wall, or use the squat rack frame to support you as you step up. Try not to use a box because it is very easy to fall off the ball just as you’re mounting or dismounting and the sharp corners of a box aren’t the best things to land on.
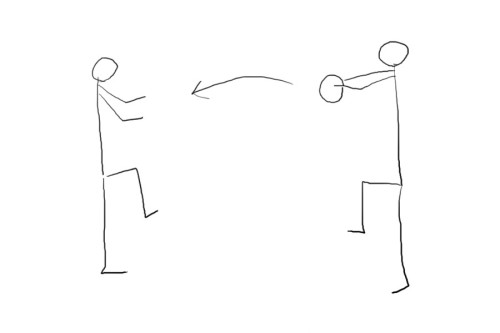
Another exercise with a heavy medicine ball. It is especially easy in exercises like this to forget to draw your navel towards your spine and activate the right muscles, so don’t forget. Begin by just throwing the ball at each others’ chests, but you want to eventually be throwing the ball to either side, and in slightly unpredictable ways. Also slowly increase the distance between throwers because it forces you to throw the ball harder, and that in turn teaches you to brace your ab muscles more strongly.
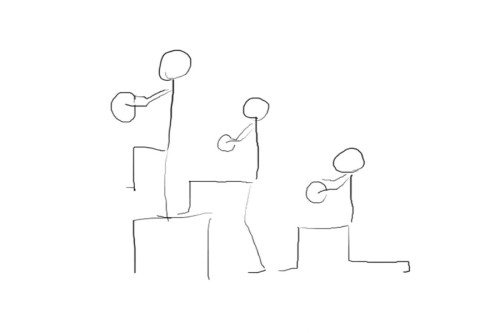
This exercise is much more speed skating specific, but can be useful to the average core stability workout nutcase. Holding the ball out in front of you with slightly bent arms, begin in a lunge position, with both knees at 90 degrees, then step up onto a box (it should be about knee-height), stand up straight while bringing the leg you didn’t use to step up with up in front of you (the diagram is better than my description). It should be done in one fluid and controlled movement, and not too quickly. Pause at the top, count to three, then come back down. Do about ten on one leg, then swap legs. Eventually, when you’ve mastered this movement, you can do it with a barbell across your shoulders, but be careful and have someone to spot you, especially if the weight starts to get heavy.
Start with a very light weight on the bar (or just the bar) when you switch because the position that your abs are in when you have your arms in front of you, compared to when you’re supporting a barbell is slightly different and and arms-in-front position is more stable. (Rugby fans will notice Johnny Wilkinson’s preparation before a kick involves holding his arms out in front of him – that’s why he does it, to stabilize his core before the kick).
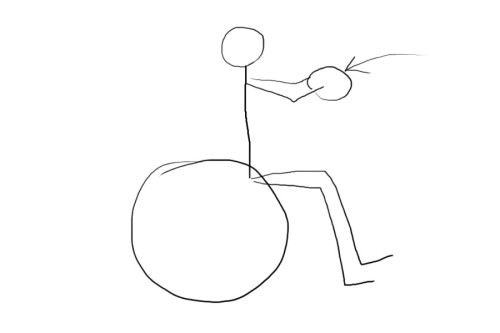
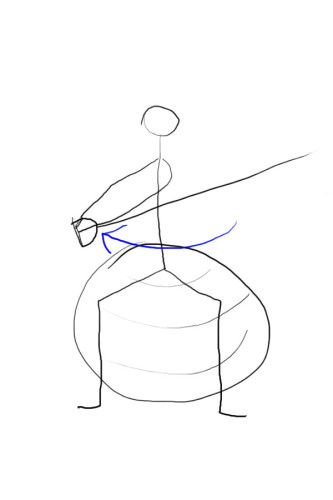
This last exercise involves a twisting motion, and requires a cable attached to some weights. I imagine professional tennis players and woodcutters do this one all the time (I call it the “wood chop”), but anyone else who uses their abs can benefit too. Simply sit on the inflatable exercise ball, draw your navel towards your spine, and pull the cable across your body with your arms straight. Try to lock your arms and shoulders into one solid object and twist that object against the lower half of your body (i.e. keep your hips still). Not a lot of weight is required to make this an effective exercise. Concentrate on keeping your heels on the ground. If your heels lift off, then you’ve got too much weight. Again, the object is to move in a slow and controlled manner.
So there you have it. The core of my core workout. Suffice to say that I didn’t miss out on the Olympics for lack of a strong core (it was mostly to do with my speed skating technique). For sports that are particularly core-intensive (like mogul-skiing, their workout is crazy) there are more, and harder exercises of course, but even they would have had to start by mastering these.
There is far too much emphasis these days among sports people to concentrate on building up the motor-movement muscles, and WAY too much emphasis on the appearance of muscles in “general fitness” circles. Truth is, there are huge gains to be made in sports performance from concentrating more on technique, coordination, and core stability. For the casual weekend warrior, this is especially important for injury prevention.

Leave a comment