More Truth Behind the Shutter
Continuing this distraction from the day-to-day ho-hum of questing for world peace comes the second part of my commentary on some particularly memorable photos (for those who really haven’t figured out how to navigate this site, the first part can be found here). Rest assured, the fourth part of the Earth Debate will soon be published as will a more extended response to some of the discussion generated by a Perspective on Economics. (Don’t forget to click on the photos to see hi-res versions)
Taking good photographs is not only about being artistic and having a good eye. Modern SLR cameras are seriously sophisticated things and learning how to operate one properly is no trivial matter. Sports photography is probably one of the least artistic and most technical sub-discipline that you can do. You just need a fast camera and a good lens right? Well, yes and no. Sports is the most unforgiving type of photography there is if you don’t have good gear, especially lenses. But you still need to be good at operating a camera.
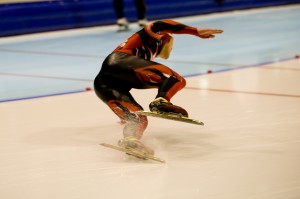
Joji Kato is the junior world record holder in the 500m, and is one of the leading contenders for the gold medal at the upcoming winter games in Vancouver. He can hook it around a corner at about 60km/h which is scarily fast. Tracking an object moving at that speed through the eyepiece of a heavy SLR camera and a 200mm lens is not easy. A camera that can take 8 frames per second certainly makes the job easier, but you’d be surprised how difficult it is to track something at this speed while taking photographs. A trick I like to use is to actually keep both eyes open – my right eye keeps the subject in the frame while my left eye is able to see the bigger picture.
When Joji exited the second corner of his 500m at Heerenveen, I knew something was amiss. His left skate “booted out” which basically means that he put it down at a slightly funny angle and it caused the skate to be whipped out from under him. I instinctively pressed the shutter release and ended up with an amazing sequence of his crash. This is the second photo in the sequence and is my favourite because it is the point-of-no-return. You can see his left skate digging into the ice and twisting his body out of line. He slid about halfway down the straight before slamming into the cushion – he was physically unhurt. The next day, he skated it again and won.
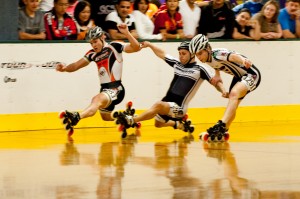
Another important thing to remember is to keep your wits about you. When there is a close finish, it is sometimes easy to get caught up in the excitement only to miss the photo. Everyone knew that this race was going to be close, there was a handful of people who possessed one or more world championships jerseys. There was a lot of pushing and shoving going in, and coming out of the final corner so I stepped around the official photographer for the event (who was busy watching it and not taking photos) and pointed my camera at the line and just pressed the shutter.
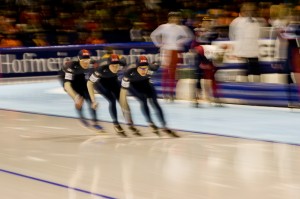
Just because sports photography generally focuses on the more technical aspects of taking a photo doesn’t mean that you can’t be artistic. While I would be the first to admit that a photo like this would probably never run in a newspaper, I like the way that the motion blur gives a sense of movement. From a technical standpoint, this was notoriously difficult to capture. I had to wait for precisely the right part of the skaters’ step so that they would be moving directly towards the camera as I panned from left to right with the shutter open (which is why they aren’t left-right blurred as much as the background).
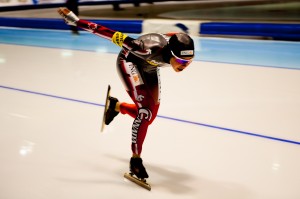
Sometimes, in editing, you chance upon something unusual that happens to look good. This was the first photo I took of the entire meet, and I was just playing with the settings on the camera. Afterwards I was playing with the contrast and shadow settings, and adjusting the curves because I didn’t like the way Nicole’s braces seemed to “pop out” of her mouth because of the way they caught the light. The result was this dark and very sharp-contrast image which eventually got used by one of her sponsors on some advertising material.
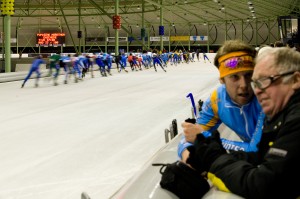
Another thing I like to remember is context. For me, what a photo is basically try to do is to communicate something. The more, or the more powerfully it communicates something, the better. You’ll hear photographers talk a lot about “dead space” which is basically wasted space in the photo which isn’t giving the viewer any new information. This photo is almost at risk of trying to convey too much information. You have the peleton of skaters with the information board in the background showing how many laps have been skated. You’ve also got Wayne and Bill Begg in the foreground discussing the race (they kind of “frame” the photo nicely though, don’t you think?). Context is also important for knowing what you’re looking at.
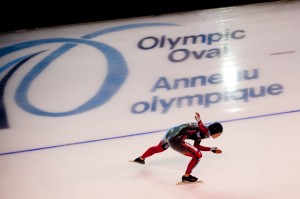
Nicole seems to have a way of sneaking into my good photos. I like this capture because it doesn’t really show very much, but just enough for you to know what’s going on. Here you’ve got a skater skating… but where is she skating? If you couldn’t read, you wouldn’t know, but these days it is reasonable to assume that the viewer can read (especially if you’re on a website).
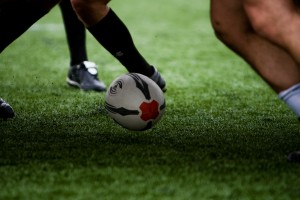
Sometimes freezing something in mid-air can convey motion just as much as blurring it can. This is a rugby ball just as it has been thrown into the scrum. Anyone who knows the sport of Rugby well would instantly recognize what’s happening here. This photo was part of a series of photos which made up an audio slideshow showcasing Columbia University’s rugby team.
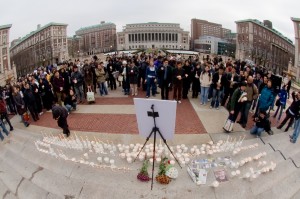
There are many tricks the photographer can use to draw the viewer’s attention to a certain part of the photo (other than freezing a rugby ball an inch off the ground in the middle of a scrum). While not particularly common, the method of using a lens’ distortion to draw the eyes of the viewer to elements of the photo occasionally crops up even in print media. The memorial service following the tragic death of a student at Columbia was attended by many. I wanted a way of capturing the large crowd without the crowd dwarfing the candles or the photo. I opted for the fisheye which enlarges things in the center of the frame and brings your attention to them. Although the news editor at the time wasn’t particularly fond of fisheye photos appearing in the newspaper, the editor in chief liked it enough to put it on the “good work week” pin-up board.
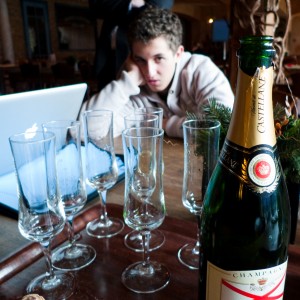
The best photos need no explanation. The laptop computer towards the right of the shot can possibly be viewed as a distraction, but it also helps balance the light-dark balance of the photo. There is nothing tricky about the exposure here, just like the shot of St. Nick’s pub discussed previously, this was one where I just saw something that I thought looked cool, and took a picture.
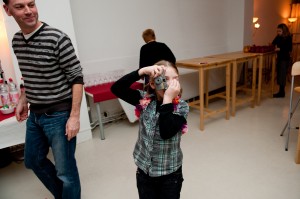
Parties present a wealth of photographic opportunities. The real trick is to somehow capture the mood of what is happening through the photographs. Capturing kids on camera is an especially difficult thing to do because they are often camera shy and, in any event, will usually react to having their photo taken in some way. Whenever I photograph events, even parties, I try to be a “fly on the wall” and not be noticed (which I’m generally good at doing) but kids seem to have a knack for noticing you. I liked this photo because it shows one of the kids doing something that she would have done regardless of whether or not I had a camera. As soon as she lifted the camera to her eye and had committed to taking the photo, I quickly did the same and was able to beat her to the shutter (I was surprised that the auto-focus was quick enough to take this actually).
Taking good pictures of insects is almost as difficult as taking good pictures of children, but for slightly different reasons. They are both small and unpredictable. Capturing this bumblebee was tricky because it moved too quickly for the autofocus to track reliably. The answer – manual focus. Manual focus with a 200mm f/2.8 lens is not an easy thing to do, and my keep-two-eyes-open trick came into play once again. To get the focus right I tilted backwards and forwards slightly to make slight adjustments to the plane of focus and, as soon as I saw the bee in focus (or saw that the bee was about to be in focus) I pressed the shutter.
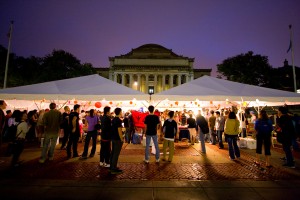
Night photography presents interesting challenges because of the lack of light. This often gives you more scope to be creative with exposure. Modern digital SLR sensors are extremely sensitive to light, much more than our eyes or film. In this photograph, I was able to take advantage of this and overexpose the image slightly (the real scene was a bit darker than what you see here). The sky, for instance, was almost completely black at the time, but the sensor was able to pick up the slightest amount of light leftover from the sunset. The overexposed light from under the tents also makes that part of the photo look much “warmer” (I also played with the colour temperature of the photo) and more inviting, reflecting the “feel” of the scene.
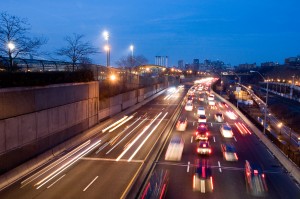
This was one I took for the Spec. We needed a photo for the story on congestion pricing, so a traffic jam seemed like a good idea. The photo editor knew a good location to get a view over the West Side Highway but it was getting a bit late. By the time we got there, we had lost the sunset light. To make matters worse, the bridge across the highway had a very high fence around it which would obscure the view onto the road. So I did what any self-respecting photojournalist would do and climbed the fence. When I got close enough to the top, I reached over and started snapping away, but I wasn’t the only thing snapping – an overzealous security guard was fast approaching and shouting at me to get down. I looked at the screen at the back of the camera and wasn’t satisfied with what I had, so I changed the settings to get a longer shutter and reached over and started taking more photos, keeping an eye on the screen and adjusting the exposure as I went, all the while shouting “I can’t hear you above the traffic” to a very angry security guard. I eventually apologized to the guard, insisting that I couldn’t hear what he was saying above the noise of the traffic. This photo was the lead photograph on the front page the following day.
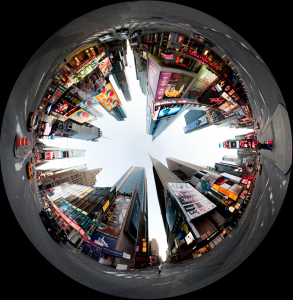
This final photo is another product of my 5am wake up which was discussed earlier. The light was perfect and there was very little traffic (by times square standards) so I took a series of about 12 photos from the one spot in the middle of the intersection (I waited for the red light, don’t worry). After playing with the stitched panorama for a while, I couldn’t get it to work in the “usual way”. I had envisioned a dark asphalt ball with buildings radiating out from it, but it never seemed to look right. Instead, I flipped the photo and transformed it the other way, so that all the buildings pointed to the center of the circle. I instantly knew that I had hit on something… and there you have it.
I hope this two-part series has enlightened you on how I go about taking my photos and has possibly inspired and informed you for your own photographic endeavours. The most important thing is to enjoy doing it, and don’t be afraid to try new things. Digital photography allows you to take as many pictures as you like at zero extra cost and that is something that you should definitely take advantage of. Good luck!


As always, I love reading your entries (especially when I am in them! Whoo!) 🙂
Great pictures. I especially love your stitched panorama picture of times square. How exactly do you go about “stitching” the 12 photos together? Do you use iphoto?
Once again Goed Gedaan!
p.s. I think its hilarious that you have approximate reading time and word count at the top right hand corner of your articles. Makes me want to time how long it takes for me to read it. I actually read your article in less than 15 minutes…:P
nvm … the process was described in your other article.My bad.
Still, it seems complicated to me. Don’t even know how i would go about doing that by myself.
Daniel: the laptop is on the right of your subject, but at the left of the shot.
Love the new photo website btw.